Saturday, March 30, 2019

Master Bathroom Renovation

I realized writing this that it has been over a year since my last post.  Although it has been very long since the last post, the house is actually almost completely done; I have just been bad at updating the blog.  I thought I would take a minute to look back on one of the larger projects and maybe get caught up with all the work that has been completed.  In this post we will look at the Master Bedroom which I completed a little over seven months ago.  

First off, let's look at what the space looked like originally.  It was a classic 70's style bathroom where the sinks are in a separate room from the shower and toilet.  There was also only a half wall between the sink/closet area and the bedroom.


Basically there was nothing to keep and I needed to just start from scratch.  Unfortunately I did not take many pictures during the initial demolition.  Here is a picture after we tore a lot of the walls out and started rebuilding.  During this time I moved into the other completed bathroom.  In the pictures you can see a pocket door that was installed so the toilet room can be closed off.  The toilet was also turned a quarter turn.  The gap in the drywall in the ceiling is where the original wall was located breaking the space into two rooms.  As a side note for these pictures, all the wires hanging down were disconnected and removed later so they were not live. 


Part of the process was moving the sinks to a different wall which involved adding new sewer and water lines.  In the picture below you can see where we also closed in the half wall to make the bathroom an enclosed room.  


After all the framing was completed, all the sheetrock work was completed.  This room also had no ceiling lights so I added five can lights at the same time.  I also decided to add my home audio system to this room so I have a speaker in the main part of the bathroom as well as a waterproof speaker in the shower.  You will see that one strip of wood in the picture below next to the shower.  This will be covered with tile but it is there so I had solid wood to screw the frame-less shower door into since it weighs almost 75 pounds.  


The next big step was to start on the shower.  The prior shower had a fiberglass base but I really wanted a cement shower pan.  The shower pan is also three times larger than the old shower.  I added extra floor joists below just in case since the cement pan would weigh over 400 pounds once complete.  

I started by putting down tar paper to help keep moisture away from the subfloor.  I then spread a layer of sand and mortar mix to begin the slope so water would drain to the drain.  


After that layer of cement had dried, I then added a rubber membrane and plastic slope sticks to help lay the last bit of cement to slope the water to the drain.  


Once the last of the cement was laid, it was time to do the plumbing.  In the picture below you can also see a bathtub installed.  I special ordered this tub as it is over six feet long and about 24" deep so it is more of a resort style bathtub.  This bathroom only had a shower before so it turned into a true master bathroom.  


I moved the shower controls over to the side wall and then ran the shower head to the other wall.  This way I could turn on the shower head without getting wet. You may see that there is a third handle.  This is because I added a shower head selector.  You can see in the second picture that there is a 24" square rain shower head.  I ran a pipe through the ceiling and into the attic to attach to this shower head.  With this selector you can choose the shower head on the wall or on the ceiling.    


I then covered all the walls with cement board to get ready for tile.


When it came to tile, I wanted to use multiple types.  I used a 12"x24" tile for the floors and walls.  I also used a 6"x24" wood plank looking tile for an accent wall at the front of the shower to break it up a bit.  You will see the floor is red in the pictures below.  This is an additional water barrier that was applied before the tile.  The small silver box on the ceiling is the waterproof speaker that is made by Kholer.  By this point I am getting pretty good at tile work and I became very OCD with all the straight lines in the tile.  


The last part of the shower was to add the stone floor and then grout everything.  To get a more contemporary style, all the grout on the walls was white and the rock floor was a grey.  The stone floor is real rocks that have been ground flat so they do not hurt to walk on.  


Below is a picture once all the floor was grouted.  You can also see the framelss shower door and glass panel.  Custom glass is extremely expensive so I went for pre-fabricated panels and just made sure I built the shower around them to the exact size.  


The next step was adding the vanities.  I ordered these at the same time as my kitchen cabinets but still needed a top.  You can also see a wood cover I made for the front of the bathtub in the picture below.


I really wanted to do a quartz top since it will not stain and is anti-microbial but it is a custom size and I had quotes of over $1500 for the top which was a little too expensive for me.  I instead went and bought a ten foot piece of quartz from the company that did my kitchen counter tops.  My brother and I then cut the piece to size with a saw that had a stone blade.  I then took that piece and my dimensions to a stone fabricator and just had them cut out the sinks and faucet cutouts.  By doing it this way, I completed the top including sinks for about $800.  In the picture below you can see the finished top as well as the glass and stone backsplash tile I installed.  


After the top was added, the bathroom was pretty much done.  Below are pictures of the completed project.  You will also see the floating shelves I made to add a couple more architectural details.  


It took quite awhile with all the construction but it turned out better then I hoped. This was the last major piece of construction for the top floor and the house is finally feeling like less of a construction zone.  In the next post I will show what I have done with the Master Bedroom.  

Saturday, October 28, 2017

New Water Feature

There really was only one large project in the backyard this summer.  This was to remove the small garden and build a new water feature.  Where the water feature was going to be located was on the side of my house where it really wasn't very private from the neighbors.  Because of this, I wanted to make the water feature have a built in pergola so it would help block that side of the house.  I started out by creating a 3D rendering of what I wanted to build to make sure all of the proportions would be correct.  Below was that rendering.


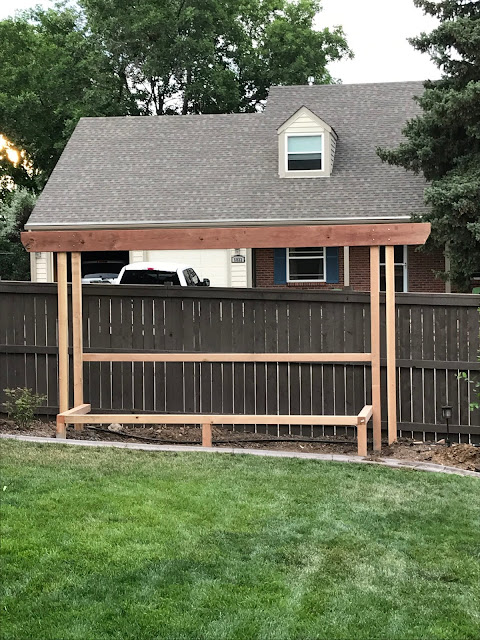
The next step was to build the frame work for the pergola as well as the bracing for the water feature.  Since the ground does slope on this side of the house, I built everything level and accounted for the slope when I add the other pieces.  The vertical posts that hold everything together are buried three feet in the ground and set in concrete so that nothing will move from all the weight of the water.  For a reference of size, the top board is 16 feet long.


Since I would be putting a plastic liner in the pond area, I went ahead and completed the painting first so that I would not have a chance of puncturing the liner working around it.  


For the back of the water feature I used cement board and then covered the board with 18" travertine stone tiles.  Inside the stone there is three 24" stainless steel spillovers.  I found these on eBay for about $40 each.  It was a little tricky, but I cut the spillovers into the pieces of stone so that it looks like the water is coming right out of the stone.  The black liner is made for industrial ponds so it has a lifespan of about 20 years.  Below is a picture once the liner was installed. 


Once the liner was installed, I decided to try it out.  Below is a short video. All the plumbing for the fountain is what is used for pools.  I have a 3,200 gallon per hour pump attached to the spillovers and all the pipes are run in 3" PVC so that there is plenty of water running through the system.  I even hooked up the pump to a controller so I can turn it on inside my house or from my iPhone like all the rest of the lights in my house.  The pump is actually about 20 feet to the left at the corner of my yard so you cannot hear it when it is running.  


Since this water feature is right next to the patio with the fireplace, I mimicked the arbor and stone columns.  The way I built the columns was a little different because everything was going to get wet from the fountain.  This meant that all trim would need to be made out of PVC or cement.  The white top cap on top of the pond liner is actually cement siding that will hold up very well to the elements that was then painted with an epoxy paint so that if snow sits on the surface the paint will not come off.  I also used cement siding for the front of the fountain since it comes in contact with dirt and could get hit by the sprinkler.  In the below picture you can see that I have started adding the stone so that it will also match the fireplace.


As I was getting closer to completion, I decided that I really was not liking the front of the pond.  It was just looking too plain.  I changed this by adding some PVC strips to add some texture.  It really made a huge difference for literally $12 of PVC trim.  You will see in the below picture that the dirt is not yet built-up to the bottom of the water feature.  I planned to bring in about 5" of dirt to help make the slope of the ground not look so much on the right hand side.  


Part of the project also included adding underwater lights.  These were purchased off Amazon and I tied them into the low voltage landscape lighting I already had in the backyard.  


The last part of the project was finishing the trim and adding the last of the dirt.  Next summer I will add plants and mulch, but since this was not completed until just a few weeks ago it did not make sense to do it this year.  I will end this blog post with a few more pictures of the finished product.  It took about four weekends but it really turned out the way I wanted it and added a ton of privacy to my yard  


Friday, October 13, 2017

Entry & Stairs Renovation

One of the last main projects for the first floor was the renovation of the stairs and entry.  A prior post showed all the molding added to the entry but this post will show all the remaining projects for this area.  First a little background.  The stair railings were not the original railings for the house, but they just were not going to fit in with all the changes.  They were nice and solid oak, but there was really no use for them so I gave them to one of my neighbors to re-do their stairs.  Below are what the original stairs looked like.  


Part of this project was to also add a set of french doors on the second floor from the smallest bedroom into the entry to make an office.  I thought about taking the wall down and making it a half wall, but for re-sale value it was better to just add a set of french doors to where the office could still be considered a bedroom.   

The first step was to lay out where I wanted to place the doors.  I bought the doors and frame off craigslist from an abandoned storage unit for $60.  Below is the frame laid out in the new office.


I then went about the act of cutting out the hole and adding a header above the door.  This wall was not load bearing, but I still needed to have something to mount the door frame to.  This was challenging because all work was on the second floor open to nothing below.


I then added the frame and doors.  I am not sure where my brother was for this project, but for some reason I decided to install the doors and frame myself.  I just remember almost falling through the hole while trying to install the solid doors.  It was not my best decision to do it myself.  Below are the doors installed.


The doors were going to be the wrong color to match with everything else, so they needed to be re-finished.  Since the doors were solid wood, I sanded the old finish off and then gel stained the doors a dark espresso color.  All the pictures in this post make the color look black, but it is actually a dark brown color.  I had to tape off all the glass to be able to gel stain.  You can see below that I went through a ton of tape!


Since the doors would open, there needs to be a railing on the other side.  This would be part of the stair railing upgrade.  

On the first floor, right off the existing kitchen, there was a door that led to the basement.  


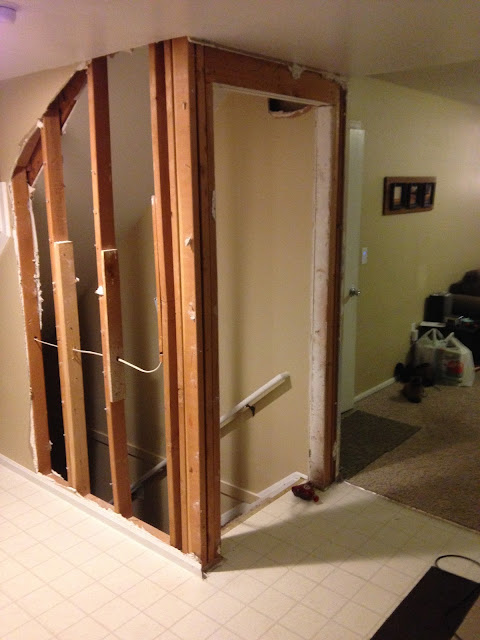
I felt this area really closed off the first floor, so I decided to remove the wall and add a railing to match the rest of the entry.  The stairs are attached to a header above, but I decided to reinforce under the stairs anyway just to be safe.  This is why there is still a post in the corner.  I also had a light switch to relocate on the wall.  Below was that progress.  


After all this was completed, it was time to work on the stairs.  Before the stair treads of the stars were wrapped in carpet on the ends.  I wanted a more modern look, so I created solid wood covers to go over the ends of the treads where the carpet used to be.  I cut the carpet back and I stained these covers the same espresso color as the french doors. I will be getting all new carpet in the house once all the drywall work is done, so all this carpet is just temporary and it will be fited correctly when it is replaced.


 Below is a picture with most of the covers installed.


I then started changing out the main newel posts.  I found these solid oak posts at Lowes and they were just what I wanted.  I was going to make my own but for the sake of time and cost, the Lowes option was a great choice.  These posts I also stained with the gel stain.  All stained pieces also received a minimum of six coats of satin polyurethane to make the finish more durable.  


I removed the old railing and I was able to use the top railing again even though I did have to cut it down to fit the new newel posts.  This was also sanded down and stained.  

Where most spindles are normally vertical, I decided I wanted to make mine horizontal to get that modern look.  I used 1.5" square tube aluminum that I used a metallic paint on for my cross pieces.  I then re-assembled the railings.  There are special fasteners I had to use including bolts to hold in the posts down into the stair treads, but even if you had a running start the rails would not go anywhere.  This railing is even stronger than the prior one with all the metal used.  Below are completed pictures including where I added a railing in front of the french doors.


Lastly, I added the railing over the opening I created on the first floor.  This included addling a stained wood piece next to the bamboo flooring so that it would match the stair tread addition.  


This project took quite a bit of time because of all the wood working and staining involved, but it really did make a huge difference to the entry.  The next post will be about the living room and then that will complete the first floor.  Thanks for checking out the progress.