Wednesday, May 28, 2014

Time for the Backyard!

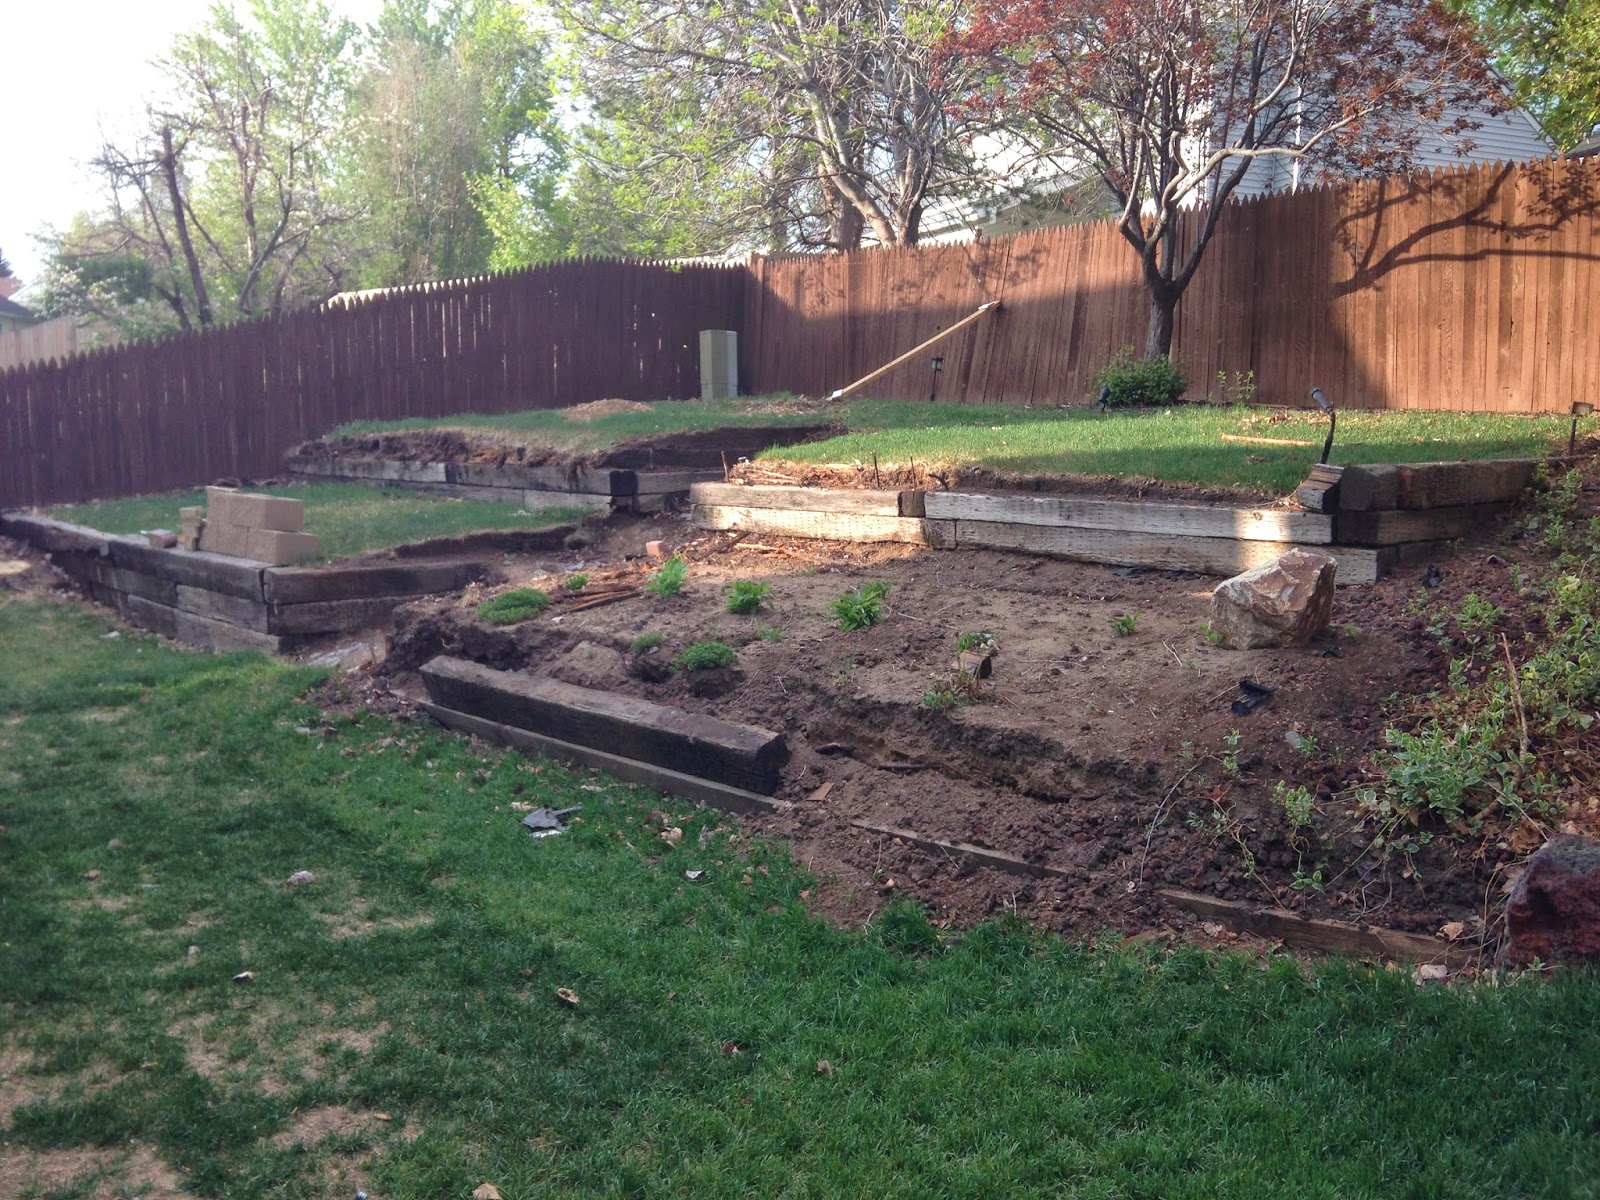
It has been quite a while since the last update and I am now in the midst of a huge backyard renovation.  Below you can see the retaining wall that used to be in my backyard.  I decided that it was time for it to go because of the age and it falling down.  I also wanted a bigger backyard for grass. The three large trees in this photo were also removed.


I started to take out the wall myself but after a few hours I realized that I would need a little help since some of the timbers were well over 100 pounds and rebar reinforced. I also had a lot of dirt that would need moved. 


I found a contractor that had a bobcat tractor and for $300 he came and removed the wall and re-graded the backyard.  I took a time lapse video from my upstairs window so you can see how it was done.


This is what my yard looked like once the tractor left. 


After the old retaining wall was removed I decided to build a cement block retaining wall at the top of my yard so the slope of the yard would be less. Here is a picture of about half of all the old timbers.  I put them for free on craigslist so most of them are now being used in someone else's yard.


I started out by doing some additional grading to cut back the soil since the tractor was not able to do this.  Below was the result when I was done. The string is for the top of the wall so that I could measure across the full length of the yard.


For retaining walls, drainage is key because any water behind the wall could make it fall or will freeze in the winter and cause it to come out of alignment.  I started by digging 9-12 inches below the surface of the ground and 28 inches wide. 


I then placed a perforated pipe in the trench.  The pipe is covered in a sleeve in the below picture that will keep the dirt from clogging the holes.


I then filled the trench almost all the way up with ¾” granite rock.  This allows the water to flow down to the pipe and then flow away from the wall. The stone was then tamped down with a hand tamper to make the rock lock into each other.  


After the gravel was placed in the trench, it was time to add the cement blocks.  These blocks were purchased from General Shale here in Denver and are a higher grade of block than you would find at the home improvement stores and is specifically designed for retaining walls.  One block is 18” long, 8” high, and 12” deep.  The blocks also weigh 78 pounds each which made the total weight of the cement blocks a little over 6,000 pounds.  It took three trips in my truck to get them all. 


I placed the first level with my brother’s help and we had to make sure everything was perfectly level otherwise all other levels would be off.  We tamped down the stone as we went to make sure everything would be solid.   As we placed the cement block we added more gravel inside the cores and filled up the gap behind the wall.  Below is after the first of three levels. 


Here is after the second level.


This picture is after the last level.  We went through nine truckloads of 3/4” granite for a total of a little over 16,000 pounds of stone.  We had to haul it all in paint buckets to the wall location so my brother and I moved a lot of stone!


Before we put the top caps on, we laid a layer of landscape fabric over the stone so the dirt will not clog up the stone but still allow the water through. 


After the caps were installed on the wall, I backfilled with dirt and added a couple of pots I had around the house.  It took my brother and I two full days to build the wall but it turned out really well.  The next two pictures will show the final result. The total length of the wall is just under 45 feet.


I still have some grading of the dirt in front of the wall and then I will add a new sprinkler system and install new grass.  Lastly I will be building a stone column at each end of the wall that will look similar the the columns I built in earlier posts except they will have built-in landscaping lights.  I will post a picture once that is completed. 

Project cost breakdown:
Excavating: $300.00
Cement Block $450.00
Stone: $180.00
Total: $980.00

The next project will be installing a paver patio to the back of my house and I hope to have that started this weekend.  Well that is all for now. 


Tuesday, April 1, 2014

Let There Be Light!!

So I have been extremely busy with work lately so I have not had a whole lot of time to work on the blog or the house.  I have spent a lot of time deciding on what finishes I want in my house so now it is just a matter of collecting the materials before I really tear into things.  For this post I will focus on one of the big structural projects on my home. 

The family room in my house was always very dark. This post shows removing the door that the original homeowners placed in the family room after construction and we replaced it with a wall of new windows.  Basicly we moved everything back to where it was originally since the door didn't make a lot of sense being in this modified location.  Since this wall where the windows would be installed is structural to the house, I had to be very careful when the wall was re-framed.  Below is what the wall used to look like.  You may notice the slit in the drywall along the length.  This was to check where the load bearing studs were so that I could frame the windows around them and decide what size windows would work. 


I ordered all the windows online from Home Depot and they actually sent them via UPS to my house.  They are a high grade vinyl with LowE double paned glass so they are good for Colorado.  With shipping all the windows came in at about $400.00. All three windows are 36” x 60” so I will definitely get a lot of light into the family room.  With the windows in my possession, the first step was to remove the drywall and insulation.  Since it is still cold here in Denver, I completed most of the framing from the inside before I cut through to the outside.  


Below you can see where I started the framing of the two left most windows.  This just took a few hours and you can see where I had to add headers above the windows to re-distribute the weight of the house around to the outside of the windows.  I made these headers oversized because there will be a bathtub above this portion eventually with a lot of weight but it really didn’t need that much structure; it is just better to be safe.  I did all this work while it was snowing outside so I waited another week to actually cut through the outside of the house. 


With my brother’s help, we removed the existing door from the family room.  After we took it out, it appears that the door was actually the original front door and the side windows were framed in with plywood and the glass was single paned.  This is probably why my family room was always so cold.  You can see the opening below. When I did this step I wanted to make sure it was warmer and that I could get all the holes sealed up in one day so the house wasn’t unsecured overnight.  Once the door was removed the countdown clock started ticking away and we had to work quickly.  I actually sold the door on Craigslist for $40 which is good because I figured I would have to just throw it out - it was in pretty bad shape.  


With the door removed I went about re-framing the opening.  This involved removing all the vinyl siding from this portion of the house on the outside.  While I did that my brother cut through to the outside of the house.


The next step was to install the windows.  We had to apply a rubber membrane to the window sills to help drain the water to the outside and then use a window sealant to install the windows.  We did have to add some exterior sheathing to where part of the original door was since there would no longer be an opening in this location.  Once the windows were in place we hammered nails into the flanges and then sealed the flanges with a special rubber tape that is designed to seal the windows to the exterior sheathing of the house and keep moisture out.  You can see this in the two pictures below.


The next step was for me to re-install the vinyl siding to the exterior.  After re-installing the original siding and the Styrofoam insulation, I was ready to re-install the vinyl siding.  This was quite tricky because I had to add new vinyl J-Molding around the windows and then cut the previous siding to fit.  This took a few hours but as you can see below it turned out quite well.  The siding is really dirty because some of it was stored on the side of the house but all this will be cleaned and painted the tan color - hopefully this weekend.  There will also be white wood molding going around the windows just like what was shown in a previous post for the front side of the house.  As a side note, the vinyl molding was purchased from Lowes.com.  As much as I love the Home Depot, Lowes had better options for molding.  When I purchased the first batch of molding locally from a window company I paid almost $15 per 12 foot section.  With Lowes I only paid $4 per 12 foot section and they shipped it free to my local store.  It took about 10 days to get here but Lowes will ship almost anything to your local store for free so it is a good tool to use since this item is not normally stocked by them locally and they have a much bigger selection online.  


While I installed the siding my brother worked on putting the insulation back and installing drywall.  This is just temporary to keep the cold out since we will be doing a troweled plaster texture on all the walls and repainting at a later point.  I will also be adding molding around the windows on the inside as well. 


Well that is really it for that project.  With summer fast approaching I have started planning the work for the back yard.  My plans are to remove some trees, re-grade the backyard, add a retaining wall, build an outdoor fireplace, install a new paver patio on the back of the house, complete the exterior painting, and build a patio with a huge pergola for the side of my house.  I will have lots of work to do but I should have some really neat blog posts.  To leave you all, below is a picture of the greenhouse.  These plants are for my house and my brother’s house.  Most of these are from cuttings of plants last year or seeds.  My brother has really been working on this but it should help make a neat yard this summer.  Keep watching for more updates!


Sunday, February 9, 2014

Let The Demo Begin....

It has been quite a while since my last update.  With the holidays, cold weather, and crazy amount of extra time at work I have not accomplished as much as I had hoped.  The first big project that I completed was removing the wall between the family room and kitchen.  This wall was not load barring so it was an easy removal.  You can see in the picture below the wall before it came down.


I scored the drywall across the ceiling to cut the drywall tape in order to keep from causing more ceiling damage when the wall came down.  The below picture shows the interior of the wall.  The person that originally framed this apparently did not care about the interior support being square. 


The picture below shows what a difference removing this wall made. It took less than an hour to remove the entire wall. 


I will be raising the ceiling at a later point so I did not worry about patching the drywall.  The far door will also be removed shortly and three large windows will be added to that wall to add more light to the family room.   

I have also been planning for the next big project which will be tearing out the master bathroom.  Currently the master bathroom is separated into two rooms.  I plan to remove the dividing wall and make one large room.  One cool feature I am adding is speakers in the bathroom for my whole home audio system which includes a waterproof speaker to put into the shower.  I am pretty excited to get this all installed.  Below you can see what the bathroom currently looks like.


The below renderings give a little better idea of what the floor plan will look like.  The colors and cabinets are just to fill the spots but will not be what it looks like when it is completed.  I will be using more contemporary sinks and a vanity with more cabinet space.  There will also be a frameless glass door on the shower.  I used Google Sketch-Up for the drawing and it turned out pretty well for my first try.  The entire bathroom will be tiled so it is about time to break out the tile saw! 


Well that is all for now.  Stay tuned for more frequent updates as work picks up again!   

Saturday, December 7, 2013

It Doesn't Even Look Like the Same House.....

It has been almost a month since the last update and my house barely even looks the same.  Last post showed that I had started painting and had started the arbor above the garage door but a lot has changed since then. 

One of the first projects I completed was the arbor over the garage door.  As you can see below it turned out real well.  After trying six different colors of stain, I couldn’t find one that looked real good with my other house colors.  I wound up mixing multiple stains together until I found a color I liked.  I then took that color to my local home depot and had them custom color match a gallon of it since my testing was only a few ounces at a time.  I feel I found the perfect color.  In the last post I had not yet placed the top boards on the arbor.  These boards are all cedar so they will hold up better outside.  In this whole project there was a little over 120 linear board feet of lumber used.  The entire arbor including the stain cost under $250 to build; so I got a lot of bang for my buck! Below is a picture of the completed arbor. 


Another huge change was the new roof was installed.  This picture was from a couple weeks ago since there is snow on my roof right now, but it made a huge difference.  Here is a reminder of before:


And here is after:


The next project that my brother and I completed was adding new shutters to the house.  These are made out of cedar as well and stained the same color as the arbor.  It took about 20 8-foot long boards to make all 10 shutters (8 upstairs 2 downstairs).  Total cost for the shutters with stain was about $120.  As you can see, the shutters really finished off all the other little pieces we were working on.  You can also see that I started the Christmas decorating.


One of the last projects was adding the windows to the garage doors.  Many times you have to order your garage doors from the factory with the windows already installed.  This can cost around $1,500 a door.  Obviously this is out of my price range, and my doors are already new, so I went with a different option.  My brother found this online company: http://addingcurbappeal.com/garage-door-windows.html  The total cost was about $200 for both doors and it made all the difference in the world.  These windows are actually plugs so people cannot look into your garage, which is more secure, and you do not have to cut holes in your garage door.  The windows are made from black acrylic with white vinyl moldings so they will never rot.  They simply screw onto your existing door and my brother and I installed all of them in about 30 minutes.  After having them on my garage, I do not think that I could go without on my next house.  From 5 feet away you wouldn't even know that they are not the real windows. 


So here is an overview picture of what the house looks like now.  Because of the snow and it getting dark it threw the colors off, but it really shows how things are coming together. It is turning out even better than I ever expected.


If you need a reminder, here is what my house used to look like:


Lastly, here is a look at my Christmas decorations.  Anyone that knows or worked with me knows I love Christmas decorations.  Now that I finally have a house I was able to decorate the way I really wanted to all those years I was in an apartment.  The penguins (doubie and doubie dos) and polar bear have made a comeback as they have been with me at every school I have worked at for the last 8 years.  At every place that I have worked I had the scarves on them match the school colors.  Even though I now work in student housing that primarily houses University of Denver students, I don’t really have any allegiance to them (sorry DU readers – I went to UNC and OSU).  So because of this I changed the scarves to brown and tan to match my house.  Now before anyone thinks I spent hours knitting scarves for them (which I have no idea or interest to do) I made them by cutting felt and then hot gluing them together.  It only has to last about 6 weeks and it works. You can see the chains in the picture but that is because I really don't want them stolen.  I anchor them to the ground with 14 inch steel spikes. 


Here you can see them outside after all the decorating is done.


I also put together all the garland and trees for the front of the house.  I added pine cones, lights,  and burlap ribbon to all of it – after all a dude lives here so it really needed to look that way.  You can see my trees in the new pots for the front door below.  The pots are all metal and fit a little better than the old ones I had that were made if wicker.  Those will be re-purposed for the back yard. 


If you know me real well you know that I cannot stand glitter.  To me glitter is the herpes of the craft supply world – once you get it, there is no way of getting rid of it.  So there is no glitter on the outside of the house and the few ornaments I have inside that have glitter on them were encapsulated in a clear coat before it even made it in the front door :)  Well I think that is all and I will leave you with a picture of the house with all the lights on.  On to the next project…..


Sunday, November 10, 2013

Things Are Starting to Come Together.....


My brother and I have made great progress over the last few weeks on my house.  First off, the rock work is done!  This took far longer than I was expecting but it really makes the front of the house.  I had purchased three pallets of stone and only used one of them so the rest will be used on a retaining wall and outdoor fireplace that I will build next summer.  I also have completed the last railing which can be seen in the below picture.  I have done a little more trim painting but still have a couple more coats to go.  I am going from white trim to a dark brown so it takes many coats. I can really only paint when the surface is over 45 degrees so this time of year I can only paint in the afternoons.  I also started painting the downspouts which you can see in the pictures in this post.  Over the next week I will do all the touch-up painting on the front of the house. 
I also recently finished some trim around the windows.  The trim is exterior siding that I cut down and screwed to the side of the house.  After filling the holes, caulking around the edges, and painting it looks real good.  I will add new shutters later.


The bottom of the trim around the windows is not yet completed.  This is because I will be getting a new roof in the next week or so.  The materials are backordered so it had delayed things a couple weeks.  Here is a picture of the shingle I have chosen.  I am pretty excited about it because the roof I have now looks terrible with the new paint color and I have always hated this roof color.  I had to file an insurance claim but basically I am getting a brand new roof for my $1,000 deductible.


The big project I worked on today was relocating my downspouts.  I re-routed the spout on the front gutter to the left side because the old spout didn't work with my new columns.  I did not want the water dumping out next to the foundation like it did before so I re-routed it to dump out on the driveway and flow down to the street.  I have a planter bed where the end of the spout was to be  so I dug into the ground a pipe to have it flow around the corner of the house.  You can see where the pipe is in the ground in the following picture.


I then had the pipe dump out through my stone retaining wall so it is not visible.  It is really only a project that I will ever notice but it turned out cool. 


The other big project has been the start of the arbor above the garage doors.  All of the cross braces have been bolted to the side of the house and are made out of cedar.  The front boards are pine 2x8s.  I have to use pine because cedar can warp as it is not as dense of a wood and with the long spans I need a denser wood like pine.  Everything will be coated in a solid color stain so it will all look the same when it is completed.  I still have all the top braces to add and will hopefully get that completed this week as well.  


Well that is all for now; it will not be long until the blog starts looking at the interior so get ready!