Monday, January 26, 2015

Completed Project Updates

Last night I started writing a long overdue post for part two of the fireplace.  I visited my blog to see where I left off and realized that of all the posts I have posted, it seems like I never show the finished project.  This post is to recap a few smaller projects from the last few months as well as the finished product from other projects. I will give the part two fireplace update in the very near future. 


Back Yard
In the last post about the back yard, I left off right after the grading was completed and the retaining wall was installed.  When the grading was completed, the sprinkler system was no longer going to be usable and it was going to need re-designed.  I added two zones and fitted them with special rotor heads that would allow me better control of the watering area and the amount of water used.  It turned out being quite a bit of work to dig down deep enough to run the pipes so that when I aerate the yard the knives do not puncture the pipe.  The soil here has a ton of clay in it so it is tough to dig in.  Below you can see some pictures of my sprinkler system as I was installing it.


I also finished the retaining walls by adding stone columns on either end of the wall.  I created these columns a little differently because they will be more exposed to weather.  Instead of making the base of the column out of wood, I made the columns out of aluminum studs and cement board so there is no chance of the elements deteriorating the columns over time.  I then added the stone the same way as I have on all the rest.  Below are pictures of that process.  


For the column caps I did something a little different.  I wanted the look of concrete but did not want the weight on the top of the column as the cap would weigh over 200 pounds.  I instead used high density foam insulation.  After I cut the insulation to the size I wanted, I coated it with cement bonding adhesive.  The solution looks a lot like Elmer’s glue but is used to bond new concrete to existing concrete. 


Once the bonding agent had dried, I then coated the entire surface with fiber reinforced cement.  This material is called Quickwall by Quickrete and is used to smooth out cement walls.  Once the cement dried it looked just like a solid cement slab.  


I then decided I wanted to add some landscape lighting to the underneath side of the caps to show off all the stone work I did.  I found some waterproof LED light strip on e-bay and paid $8 for a 30 foot roll.  


The lights run off of 12 volt DC current.  I wanted to add the lights to my existing landscape lighting but the system is 12 volt AC current so they are not compatible.  To fix this I purchased 10 bridge rectifiers off of eBay for $1.50.  I soldered the rectifier into the wire leading to my landscape system and it converted the AC current into DC current so it could work correctly.  To make the lights sit flush with the bottom of the cap I used a soldering iron to melt a groove in the foam to sit the LED strip in.  Below is a picture that shows the caps installed and the lights working.


My brother and I also added metal edging to the entire yard and used nine yards of mulch to fill in the flower beds.  We laid down black plastic to keep weeds from growing through the mulch.  A lot of people use weed barrier which is a fabric that allows water through.  I have found that plastic really works better for me since I use a drip system for my plants so water goes to the base of every plant and I find the weed barrier does not really stop many weeds.  


The last step was to add sod to the back yard.  I did not want to go to the trouble of adding seed to grow grass so I found a guy online that sells sod in Parker and it is really cheap.  I spent about $400 but it was for 1,200 square feet of sod which was 120 rolls.  It actually took me three trips to get it all because it was almost 7,000 pounds. Below are the pictures of the sod installed. 


I also had a lot of pots around my back yard and up until the golf ball sized hail hit my house, the back yard looked real good.  Here are a few pictures of that along with the hail that mutilated everything. 


Window Re-Cap
The last post on the windows ended before the trim was installed.  I used exterior trim and framed out the windows to give a little more character to the back of the house.  It was so hot during the day that I would work on them after dark so it was more bearable.


Here is the finished product.


I also framed out the inside of the windows as well using a different type of trim.  They still need painted but I will do that when I re-do the family room in the next few weeks.


I also replaced the garden window in my kitchen because it was falling apart and really didn't match the house.  I removed the window and replaced it with a new sliding vinyl window.


I am getting pretty good at replacing windows so this only took me a couple hours.  Here is the finished product.  


I sold the old window on Craigslist for $40 to someone who needed some parts off of it to fix his window that was falling apart. 

Patio
When we last left off with the patio cover, I was working on the ceiling. I wanted to do something special with the ceiling of the patio to make it seem like more of a living room.  I used 4 foot wide by 9 foot long sheets of flake board I found on Craigslist for the ceiling.  I wanted a stucco type look so I used a paint called DeckOver which is basically paint with sand in it.  It is used for coating old splintery decks so it looks solid again and fills in cracks.  You use a special roller for it and it gives a cool stucco texture.  It can be tinted any color and to do my 9 foot by 20 foot patio it took seven gallons.  I then did a top coat of regular paint just to fill in some of the small holes it leaves.  My brother then helped me install the panels because a huge 60 pound sheet of wood is hard to install over your head by yourself. 
I decided I really wanted the patio to feel more like an outdoor living room.  To do this I added four LED can lights and also wired in ceiling speakers so I can hear my home audio system outside.  I also added a switch on these speakers so I can re-route the sound to speakers buried in the ground over by my fireplace. 


The last step was to cover the seams with trim and to make the ceiling have a coffered look.  I used the same wood trim that was used around my windows but I painted it a dark color to contrast it.  It turned out really well and you can see the result below. 


Well that is all for the update this time.  I will have an update on part two of the fireplace soon.  I have also started major parts of the interior renovation so posts about that will begin soon. 


Tuesday, October 28, 2014

The Fireplace is Taking Shape - Part One

So it has been awhile since the last update and I really have been trying to complete small tasks around the house so there have not been many large projects to report on.  One huge project I have been working on is my outdoor fireplace. Since this project is so big, there will be two parts.  Below are the details for the first part of the project.  

My brother and I have been working for the last 6 weeks or so building a full outdoor fireplace and it is really starting to take shape.  This is no small fire pit, but a full outdoor fireplace to create an outdoor living room.  Below you will see a 3D rendering of what I am trying to do.  It has changed slightly but the main parts are the same.  A pergola will be attached to the top of the beams but I did not draw them in for this picture. The round circle below the ground level is where my window well is located going into the basement.  


We started with a huge open dirt lot on the side of my house that originally housed two cars in a temporary shed when I bought the place.  Below is what I started with for the dirt lot.  This picture was after we moved a ton of dirt over to this area because it sloped down very steep originally and we graded it slightly.


So we could make sure that the dirt was compacted, we drove my truck over the area many times.  My brother blared the song “Redneck Yacht Club” while I did it just so the neighbors knew our intentions.  I am sure it solidified the perception my neighbors have of me as being crazy.  The next step was to make the frame for the cement pad.  The pad is about 14 feet long by 8 feet wide and the depth is a little over 4 inches thick.  Inside the frame we added welded wire mesh as well as rebar just to add support to the concrete to keep it from breaking since there will be quite a bit of weight with all the stone and cement used.  You can see this below. 


There really was not enough concrete needed to require a cement truck, so we used a little over 40 bags of concrete from Home Depot and mixed it all by hand in a wheelbarrow.  Here is the picture after the concrete was poured. The rebar sticking up in the corners is to go through the first level of cement block to help tie the blocks to the cement pad.


The next step was to add the cement block for the base since I wanted this fireplace to be strong enough where multiple individuals could sit on the hearth and it would not have any problems structurally.  We used a little over 130 cement blocks for the construction so we were pretty sore the day after we laid them all.  The corners were filled with cement up to the top so that it would add extra strength because the fireplace is also used as a retaining wall for the new patio area.  The blocks were laid three high but only two blocks will be visible above the ground. 


In the picture below, you will see blocks laid in the center of the cement pad.  This is to hold up the concrete slab that will be the bottom of the firebox. 


The slab of concrete is used for under A/C units and weighed a little over 200 pounds.  In the picture below you can see the pad along with the walls around the firebox taking shape. 


Once this was all in place, it was time to start the rest of the structure for the fireplace.  The frame was made from aluminum studs so that they would not rust.  The frame pictured below is screwed into the concrete and blocks with concrete anchors so it will not be going anywhere anytime soon.


We then started adding the sheathing on top of the metal frame.  This is the same exterior sheathing that I used on the columns on the front of the house.  I also used a piece of cement board for the center above the fireplace just in case the fireplace ever gets real hot, but since it is only a gas fireplace it should never get very hot.  I then added drainage around the front of the fireplace because water does drain down in front of the fireplace and I do not want it causing the fireplace to shift from water.  This drainage is the same as used in a few prior posts for the retaining wall and such.  You can also see in the below pictures where the ground level has now been brought up to the final height and now one level of cement block is below ground level. 


I then added the top portion of the fireplace.  In the pictures below you can see how I cut the metal studs to form the arch and attached the wood so it would match the curve. 


The next step was to cover the entire structure with roofing tar paper to keep out the water.  There is a minimum of three layers on the entire structure but some areas have as many as six layers just to be safe. 


Here is a picture of the area once the dirt has been leveled and some landscape lights added. This area will be covered in pavers next summer.


My brother and I are much further along with this project but since this post is getting long I will hold off on any more details and make that part two.  I will tease you with a picture of where I am at with the project so far and stay tuned for the details in the next week or so.  It really is turning out well.

  
Keep watch for the next update where I will show how I completed the brick and stone work along with how the concrete moldings for the fireplace were made by my brother and I. Well that is all for now.  


Monday, July 28, 2014

Time for a New Patio


I realized today that it has been quite a while since my last update but a lot has changed.  Back at the end of May I left my job working in student housing to move into a position with multi-family apartments.  I really decided that after 11 years in student housing it was just time to stop taking care of everyone else’s kids and I wanted to have a little less stressful job.  This career change gave me about five weeks to work on my house before my next job started which was great since I was working 65 hour weeks at my old job and was not getting much progress done on my house.  One of the big tasks was the retaining wall shown in a previous post, but I have also worked on installing a new window in the kitchen, re-landscaped the back yard, and added new sod to the back yard.  The biggest project has been the installation of the back patio which I will write about it in this post. 

First off, a little history of the back patio.  When I purchased the house there was a wood deck that was about six inches off the ground and was starting to get in bad shape.  My brother pulled it up last summer and we threw it out with our neighborhood dumpster day.  Under that deck was the original concrete patio and there was literally six inches of dog and cat hair on top of the concrete up to the wood deck.  A large tree was next to the patio and it caused the original concrete patio to buckle; which is probably why there was the wood deck on top of it.  Unfortunately it looks like I do not have any pictures of this so you will just have to take my word for it.  I do have this picture of the backyard with the old timbers and you can see the pavers that were used to extend the patio.  I sold these all on craigslist since my plan includes no pink pavers anywhere in my yard. 


Here is a picture of the tree that caused the patio to heave.  It was removed with the other old trees in the back yard and you can see a little of the old patio.  


A couple months ago my dad had a couple guys available at his office so he sent them up to my house and they removed the concrete.  It took almost two days with a jack hammer because of how thick the concrete was.  We found out that for some reason the back patio was poured with a footer as if it was to be used for the floor in the extension of the house.  This made the concrete almost 14 inches deep in spots.  Below are a couple pictures of the concrete being removed. 


The guys that removed the concrete had to temporarily brace up the patio cover because there was concrete under the posts.  I then decided I wanted to move the posts on the patio cover further out to make a bigger patio.  This involved adding brand new posts.  I had to dig down over 24 inches to get below the frost line and then poured concrete into the holes for the new posts.  I then re-built the header and added extra wood to make it a little stronger.


After the roof of the patio was re-built, it was time for the new patio.  This required adding dirt to the areas where the footer originally was and then removing some dirt from the high places.  The next step was bringing in a little over 4,000 pounds of road base (which is a mix of small rock and rock dust) to put down a four inch layer across the area where the patio would be.  My brother and I then used a gas powered compactor to compress the road base to make it level.  This will help with all the heaving of the soil that can occur from the thaw/freeze cycles that we see in Colorado. 


The next step was to add a sand layer on top of the road base to lay the pavers on top of.  I chose a 16” x16” square paver to give more of a contemporary look and also because you do not see it everywhere.  The drawback was that there was over 170 pavers needed for the project and they are quite heavy when they get that big.  We used metal conduit laid on top of the road base to use as a guide for the thickness of our sand which you can see in the below pictures.  You can also see in the pictures a string along the outside edge that I used to make sure everything was square as we laid the patio. 


I then needed to compact the pavers with a gas powered compactor to set the pavers firmly in the sand.  To keep from breaking the pavers, I rolled out old carpet with the soft side down and ran the compactor over the backing of the carpet.  It worked great and kept the pavers from chipping or cracking.  I also added a small grilling area off to the side.  This will eventually have outdoor cabinets built around the grill to make an outdoor kitchen.  Lastly I added some very fine sand to fill in some of the small cracks between the pavers.  You will always have some small gaps between pavers since they will not be perfectly square.  Also over time the pavers will settle and you will have to keep adding sand.  I did have to buy a paver saw from Harbor Freight to make the cuts for the rounded part of the patio and for the edges but they are fairly inexpensive.  You can rent one but for as much as I will use it, it was cheaper to buy one.  Below is the final outcome of the patio.  It turned out great and made a huge impact on the back yard. 


Here is a picture with my new patio furniture.  The couches are for another patio I will be building here soon on the side of my house, but they work fine here for now.


I still need to build a step coming out of the house and do some painting/trim work but that is about it.  Since these pictures were taken, I have added LED can lights to the ceiling of the patio and will also be adding outdoor speakers and then covering the ceiling in exterior plywood to make it seem more like an outdoor living room.  I will add pictures to the blog when that is all done.   Well that is about all for now.  I will do another blog post here shortly on some of the other projects I recently completed so keep a close eye on the blog.  Until next time….. 

PS According to HomeDepot.com, I have made 106 purchases with my credit card at their stores since I moved into my house one year ago.  Since I occasionally pay by cash or gift card I can say I have been there well over 120 times.  I am pretty sure I am there more often than the grocery store which is probably why a lot of the people at Home Depot know my name. :) 


Wednesday, May 28, 2014

Time for the Backyard!

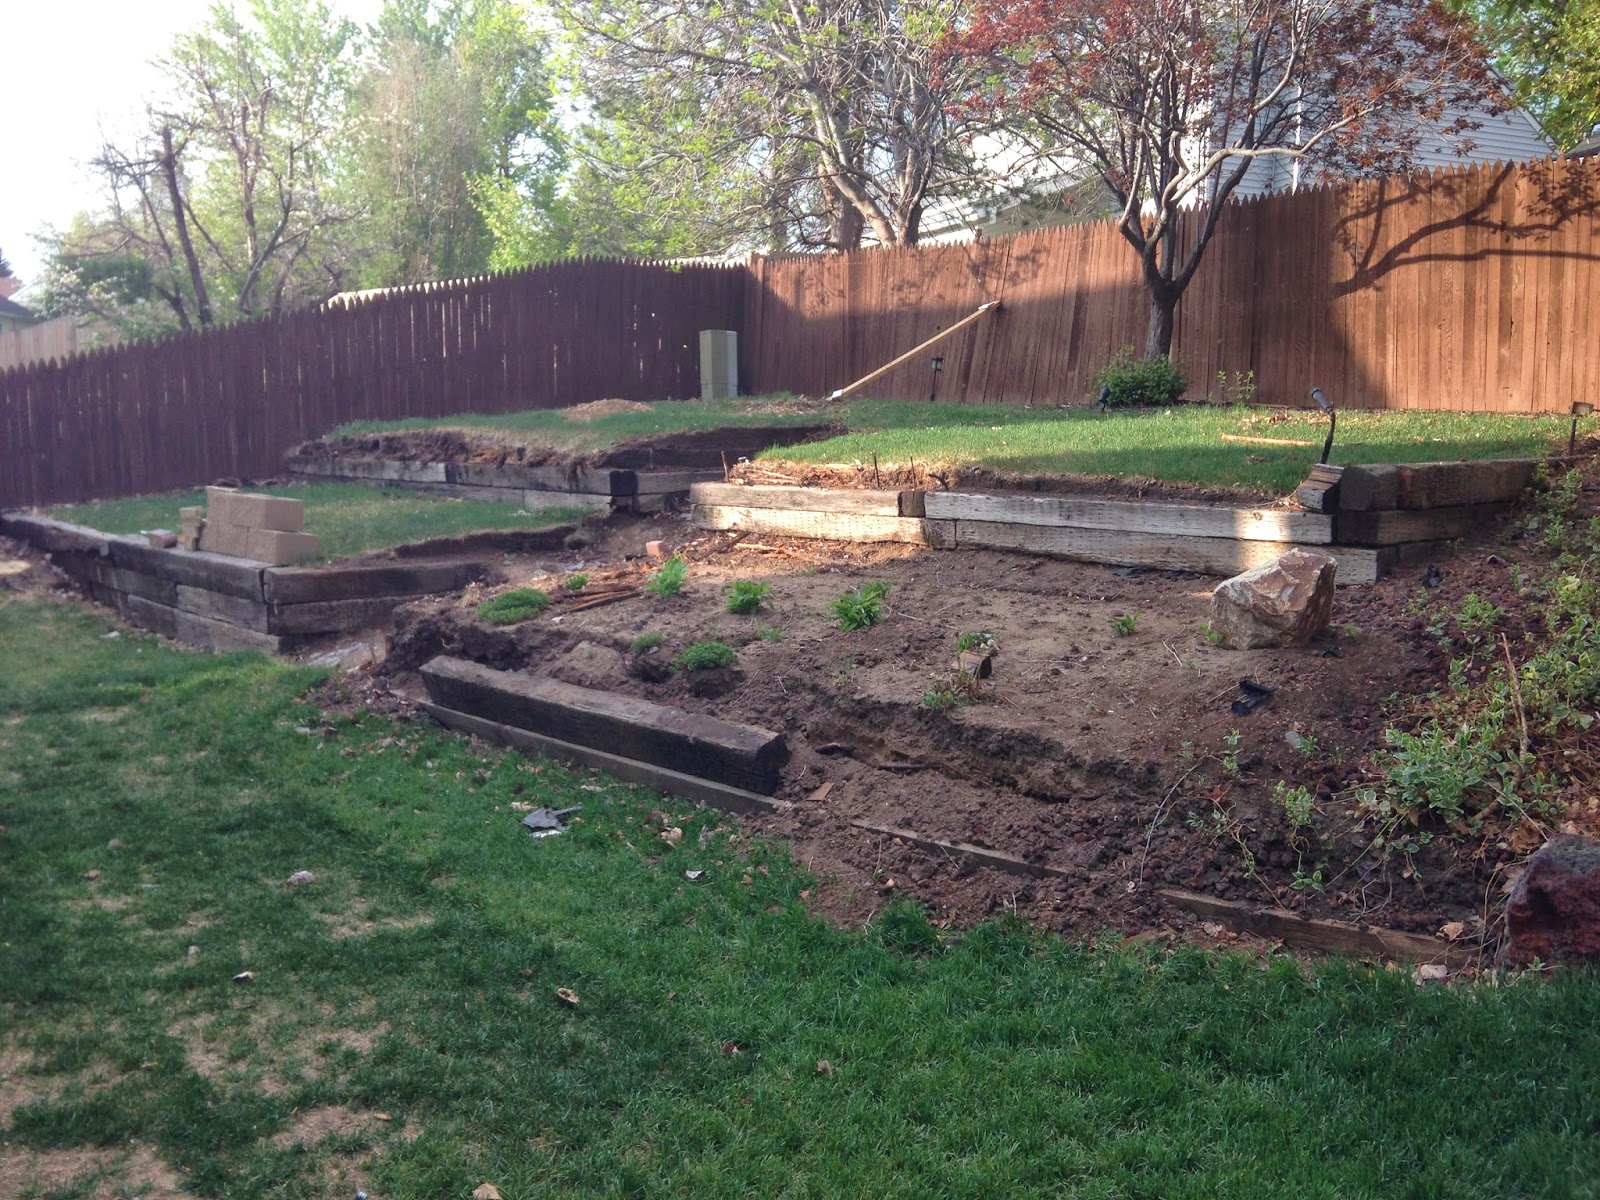
It has been quite a while since the last update and I am now in the midst of a huge backyard renovation.  Below you can see the retaining wall that used to be in my backyard.  I decided that it was time for it to go because of the age and it falling down.  I also wanted a bigger backyard for grass. The three large trees in this photo were also removed.


I started to take out the wall myself but after a few hours I realized that I would need a little help since some of the timbers were well over 100 pounds and rebar reinforced. I also had a lot of dirt that would need moved. 


I found a contractor that had a bobcat tractor and for $300 he came and removed the wall and re-graded the backyard.  I took a time lapse video from my upstairs window so you can see how it was done.


This is what my yard looked like once the tractor left. 


After the old retaining wall was removed I decided to build a cement block retaining wall at the top of my yard so the slope of the yard would be less. Here is a picture of about half of all the old timbers.  I put them for free on craigslist so most of them are now being used in someone else's yard.


I started out by doing some additional grading to cut back the soil since the tractor was not able to do this.  Below was the result when I was done. The string is for the top of the wall so that I could measure across the full length of the yard.


For retaining walls, drainage is key because any water behind the wall could make it fall or will freeze in the winter and cause it to come out of alignment.  I started by digging 9-12 inches below the surface of the ground and 28 inches wide. 


I then placed a perforated pipe in the trench.  The pipe is covered in a sleeve in the below picture that will keep the dirt from clogging the holes.


I then filled the trench almost all the way up with ¾” granite rock.  This allows the water to flow down to the pipe and then flow away from the wall. The stone was then tamped down with a hand tamper to make the rock lock into each other.  


After the gravel was placed in the trench, it was time to add the cement blocks.  These blocks were purchased from General Shale here in Denver and are a higher grade of block than you would find at the home improvement stores and is specifically designed for retaining walls.  One block is 18” long, 8” high, and 12” deep.  The blocks also weigh 78 pounds each which made the total weight of the cement blocks a little over 6,000 pounds.  It took three trips in my truck to get them all. 


I placed the first level with my brother’s help and we had to make sure everything was perfectly level otherwise all other levels would be off.  We tamped down the stone as we went to make sure everything would be solid.   As we placed the cement block we added more gravel inside the cores and filled up the gap behind the wall.  Below is after the first of three levels. 


Here is after the second level.


This picture is after the last level.  We went through nine truckloads of 3/4” granite for a total of a little over 16,000 pounds of stone.  We had to haul it all in paint buckets to the wall location so my brother and I moved a lot of stone!


Before we put the top caps on, we laid a layer of landscape fabric over the stone so the dirt will not clog up the stone but still allow the water through. 


After the caps were installed on the wall, I backfilled with dirt and added a couple of pots I had around the house.  It took my brother and I two full days to build the wall but it turned out really well.  The next two pictures will show the final result. The total length of the wall is just under 45 feet.


I still have some grading of the dirt in front of the wall and then I will add a new sprinkler system and install new grass.  Lastly I will be building a stone column at each end of the wall that will look similar the the columns I built in earlier posts except they will have built-in landscaping lights.  I will post a picture once that is completed. 

Project cost breakdown:
Excavating: $300.00
Cement Block $450.00
Stone: $180.00
Total: $980.00

The next project will be installing a paver patio to the back of my house and I hope to have that started this weekend.  Well that is all for now.