Sunday, October 9, 2016

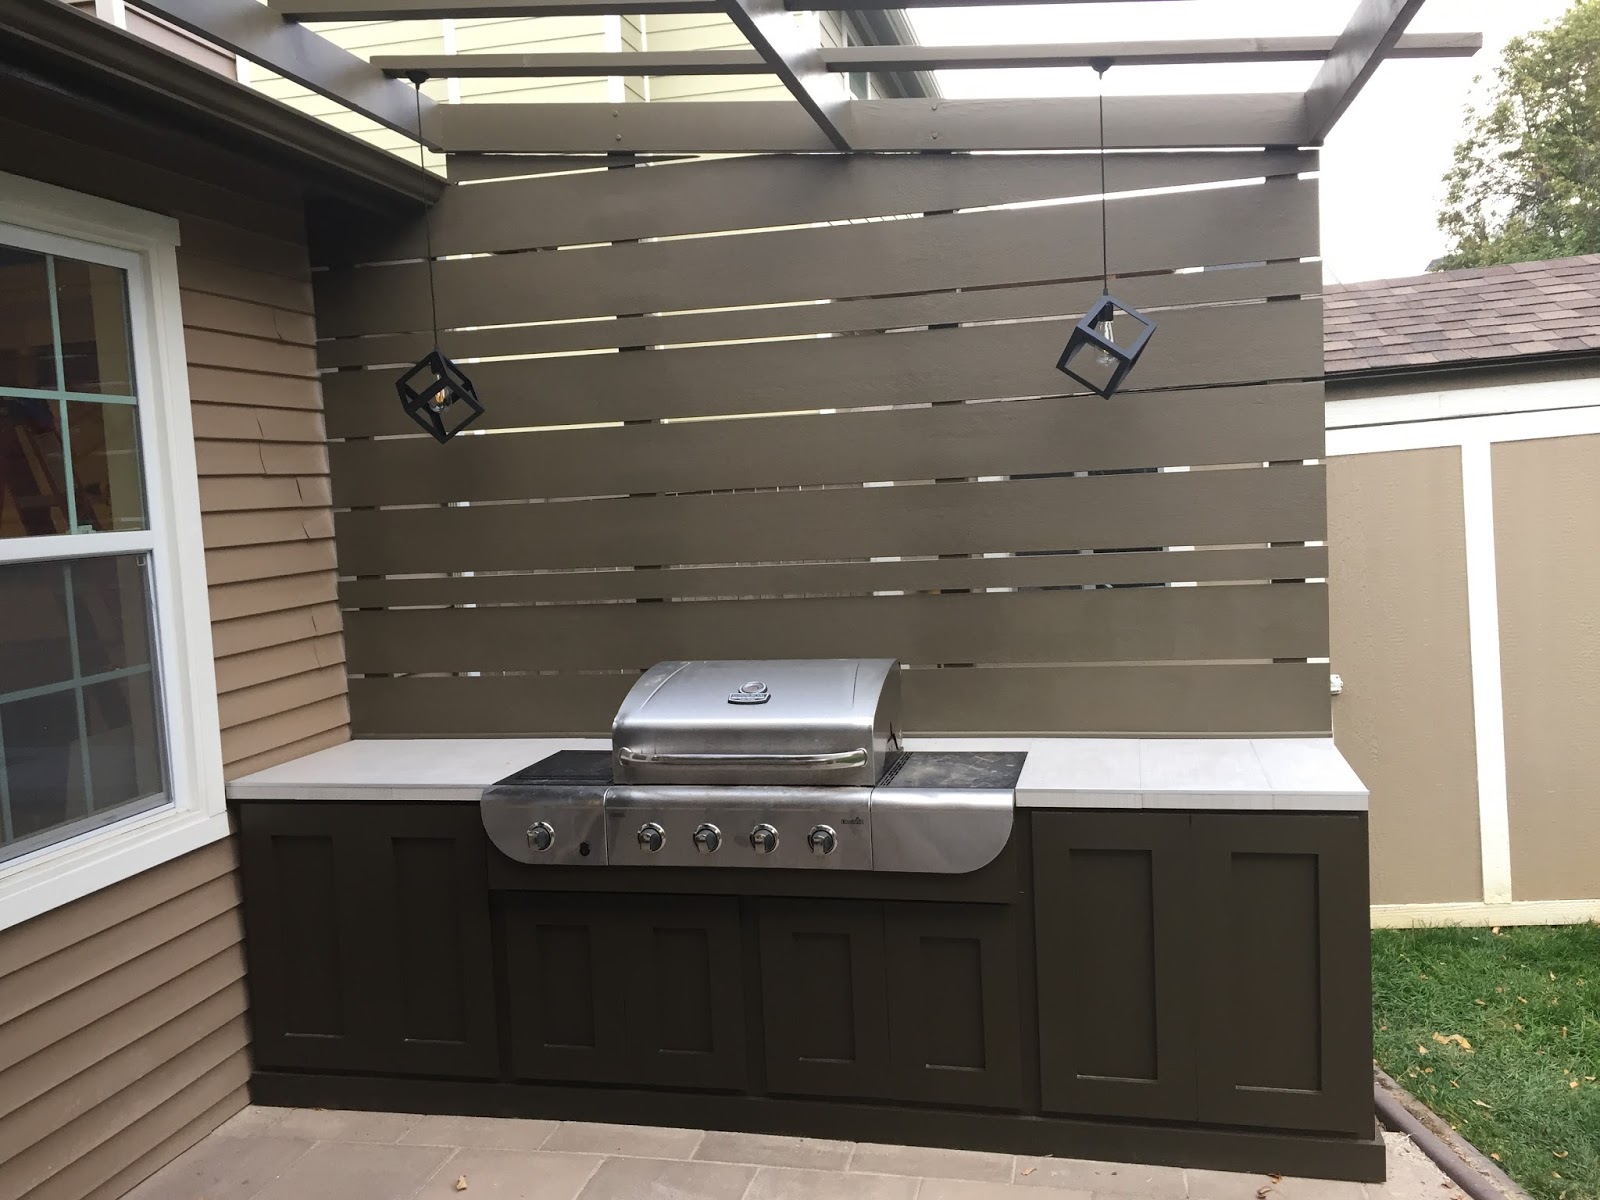
Summer Backyard Renovation - Outdoor Kitchen, New Fence, Patio Columns, Extended Patio

This summer has been very busy with many projects in the back yard.  The largest project was the replacement of the entire fence around my home.  Since I owned all the fence and none of it belonged to the neighbors, there was over 350 feet of fence that needed replaced.  The fence that I had was over 30 years old so it was definitely time to replace it.  Since there was so much fence that needed replaced, I decided to have a company come and replace it for me even though it ended up being very expensive. I figure it will be the only time I will ever have to replace the fence since I probably wont have this house in 20 years, so I might as well have a nice fence.  It took the fence builders a couple of days but it turned out great.  Below are pictures of the fence once it was installed. 


Around the same time I also had concrete edging installed around my house so you will see this in the pictures as well.  By adding the edging, it really helps in keeping the mulch out of my yard.  

Once the fence was installed I waited a couple of weeks for all the wood to dry out.  I then went and stained the fence so it would match my house better as well as help keep the fence from aging as quickly.  I used an electric paint sprayer and to do the entire fence it took almost 14 gallons of stain.  Below are pictures of the finished product.  


The next project was creating new columns for my patio.  When I rebuilt the patio awning (seen in a previous blog) I used 4x4 posts and I never really liked the way it looked.  This is what the column looked like before:


This summer I decided to make the columns a little larger.  I did this by using exterior wood sheeting cut to make a box around each of the three columns.  To make the project easier on me, I had Home Depot cut the wood for me while I was at the store since they have the large saw that can cut 4'x8' sheets of wood.  I then assembled the columns around the existing post and glued and nailed the pieces together.  


Once that was complete, I filled all the nail holes and did a rough sanding.  To coat the columns I decided to use the Deck Over 10x product again that I had used for the ceiling.  This material is made to coat old decks but has many other uses. The product is very thick and appears to almost have sand in it.  When you use the special roller that comes with the product, the product almost looks like stucco.  That is why I use it for flat surfaces as well since it is much easier than using actual stucco.  Once I coated the columns in the product, I then painted it with two coats of exterior paint and added PVC molding to the bottom of the columns so it cannot rot.  Below is the finished project.  It only took about four hours from start to finish but it made a huge difference to my patio!


The next project was to extend my patio and create an outdoor kitchen.  I did this because I really wanted a nice grilling area as well as create some privacy from my neighbors patio.  Previously the area had a couple plants but really just looked unfinished.  The first step was for me to build the two main structure posts to help with the addition of the privacy wall and awning extension.  These posts were 12 feet long and were buried over three feet in the ground and then cemented in place.  Below is a picture of the posts installed.  Note how you can see my neighbors patio since their house sits higher than mine.  


Once the posts were installed I started on building the privacy wall.  Since this wall will be in the open weather and I really did not want it to warp and degrade over time, I used cement siding.  Although the siding comes with a wood texture, I wanted a more modern look so I used the back side of the boards that are smooth.  I also used two different widths of siding so that it had a little bit of an architectural look. In the below picture you can also see the start of the awning extension. 


Once the privacy wall was installed it was time to extend the patio. I started by removing the plants, pots, and sprinkler system.  I then went in and removed almost eight inches of soil.  I then replaced the soil with roadbed (gravel/sand mix) and tamped it down so it made a very solid base.  I then filled in the area with the same pavers as the rest of the patio. Below it the rest of the patio installed.  


The next step was to install the outdoor kitchen.  I started by making a wood frame for the area.  Any wood that touches the ground was pressure treated so that it will not rot with the snow and rain. Also I lined any area that surrounds the grill with cement board just in the rare case that the area gets very hot and could catch fire. 


 The grill I used was my freestanding grill.  My parents bought it for me and is really nice so there was no reason to get a new one.  I removed the base and then just modified the counter to fit it.  


The next step was to cover the frame with additional cement board.  Since this is open to the elements, I will not have to worry about any of the structure rotting.  After the cement board was installed I then added additional molding to make the kitchen area look like it had raised paneling.  


I also added some PVC trim to the base of the kitchen area.  Once all the trim was complete, I then painted everything with three coats of paint as well as added a tile top to the grilling area.  One of the last steps I completed was the addition of the awning.  I left this part open so that smoke can exit from the grill.  Lastly, I decided that I wanted to add some pendant lights.  I found some metal cube lights on eBay for $11 each.  I wanted to have the lighting in this area attached to my landscape lights so that the lights would come on every night.  I found some LED Edison bulbs that are for RVs that run on 12 volt current but still use a standard bulb base.  I then added a dimmer to them.  Below is the finished project.  It took about 4 weekends but it really turned out well.


Tuesday, September 27, 2016

Second Bathroom Renovation

I realize that it has been almost six months since the last post but there is a ton of work being done at Casa de Sheldon.  Long story short, there were three large projects all occurring at the same time because they all required the sewer, water, and electrical systems to be modified together.  I try to post one full project at a time so I have held off posting about these projects.  These projects are: relocating the kitchen, raising the first floor ceiling, and re-building the master bathroom with a new layout. 


One project that has been completed that I will share with you is my guest bathroom on the second floor.  I had to complete this bathroom first so that I could move into the guest bedroom while I tear out the master bathroom and bedroom.  Below is a picture of what the bathroom used to look like. One has to love the blue speckled tile.  


Everything in the bathroom was existing to the home when it was built in 1978 except the vinyl floor.  The first thing I did was tear everything out.  Unfortunately once I started pulling the tile off the wall I found that the tile was mounted directly on the drywall in the shower.  Because of this, I removed all the drywall since I did have a little mold.  Below you will see this process.


The next step was to go ahead and remove the three handle shower valve and re-pipe the shower to a single handle.  It is good to know that I still have my pipe fitting skills and am good with a blow torch.  


After the plumbing was completed, I then replaced the drywall around the shower with cement board. This will prevent mold in the future and is really how it should have been done in the first place but was not common in 70's construction.


At the same time I also completed some drywall patching where I removed the old medicine cabinet and replaced the doors and jambs like I have throughout the house.  While I was at it, I also added a LED can light above the shower so there was more light when the shower curtain is closed.  


Once all the wall prep was completed it was time to start laying tile.  I chose to use a 12" x 24" tile with a straight pattern where all grout joints line up.  When you look at a shower it does not look like much surface area but my shower was actually over 80 square feet of tile. Because the tile was so large and was hanging on the wall, I could only do a few rows at a time so the thin-set could cure before the weight of the next tile was pushed on it.  The next few photos will be the progress over multiple days. The metal bars taped to the wall in the pictures are transition pieces that make the tile transition into the drywall better and match the finish on my faucets.  


About 2/3 of the way up the wall I wanted to add a decorative tile insert.  I used a tan tile to break up the brown but also to tie the shower into the floor tile and wall color.  The pieces were much longer but I cut them down to match the grout joints on the shower. I then continued the brown tile above the accent strip.  


After all the tile was completed it was time for grout.  I chose an off white color grout to match the floor tile.  I prefer to use a pre-mixed grout because not only is it easier to use, it seems to hold up a little better.  Below is the tile with the grout completed.  


Once the tile work was completed around the tub and I would not be working in it anymore, I needed to have the tub resurfaced.  The tub had a small chip on the side from before I bought the house and was a dirty almond color.  I had some contacts through my apartment vendors so I had them resurface it and it only cost about $150 to make it white and look like new again.  This was much easier than trying to change out the tub.  


After the tile surround was completed, it was time for the floor.  I found a tile I really liked but it was 18" x 18".  Just for your future knowledge, the larger the tile, the harder it is to lay.  I started out by putting cement board over the entire floor.  This was to help make a level surface but to also make the floor more rigid to prevent grout cracks.  Then I started laying the tile.  You will see plastic tabs between the joints.  This is a floor leveling system to help keep the tile level.  I haven't decided if it really helps or not because there is definitely a trick to using it with extra thin-set, but the floor still turned out well.  The next two pictures show that process.  With all the cuts I had to make, having my own wet tile saw really came in handy.  


 After a couple of days the floor had cured so I went back and grouted the joints with the same grout as the shower. Below is the completed tile work.  


I then added a freestanding vanity I picked up at Lowes, a framed mirror, and a new light fixture. To finish the bathroom up I added a curved shower rod and added all new molding.  The bathroom was also re-textured and painted like the rest of the house.  Below are the pictures of the finished project.  


This project took a lot of time with all the tile work but it turned out pretty well.  

So that finishes one of the three bathrooms.  The main plumbing is completed on the Master Bathroom as well so I will start the tile soon.  To end this post I will give you all a sneak peek of what the kitchen looked like during construction.  I am about two weeks from completing the kitchen and I cannot wait to show you the pictures since it turned out better than I could have expected.  
  

Sunday, February 28, 2016

Entryway Overhaul Renovation

It has been a long time since my last post but there has also been a ton of work being completed on my house.  There are no less than about 20 projects going on that have to be all completed at the same time, but I wanted to share a project that is now almost completed.

Inside my home there is a large two story entryway.  The entryway has always seemed very plain and it really just needed to be renovated to give it a little more character.  To do this there was three parts; removing a closet, adding crown molding and LED lighting, and adding a new chandelier and can lights in the entry.  The railing will all be redone at a later point.  To start out, this is what the entry used to look like. 


The ceiling in this entryway is a little over 20 feet tall so my brother and I had to use some pretty long ladders to get to the ceiling.  The first step was to paint the top 12 inches of the wall the new wall color. This area will be lit up with the new lighting in behind the molding and once the molding is installed it would be hard to get a paint brush behind it to do the painting.  I then created the molding profile I wanted by using two pieces of trim.  The first piece was MDF stock that was 2 ¾  inch tall by ¾” wide.  Once this molding was pre-painted I nailed it to the walls so that I would have something to mount the crown molding to. The string in the picture is to help keep everything straight since many of the ceilings are wavy (you have to love 1970s construction).


The crown molding is extra wide at 5 ¼ inches tall and since I will not be mounting it to the ceiling, I needed to find a way to make mounting it easier.  What I did was cut a 1x2 in half with a 45 degree angle and attach this to the back of the crown molding with wood glue.  This gave me added material to mount to as well as helping to keep the correct angle on the crown molding.  Below you can see how I did this.  This made mounting the crown molding so much easier; especially when you are trying to line it up 20 feet in the air.


Here are the pictures once the molding is fully installed. 


As with all the walls in the house, I am skim coating them with drywall compound to re-texture the walls.  This entry took almost 15 gallons of drywall compound and turned out to be quite difficult up high.


The second part of this project was to remove a small closet and make the opening larger.  At a later point I will be installing high and low cabinets in the opening.  Below is the original closet after I had removed the door.


You will notice in the following pictures that there are openings on the side of the closet.  This part will be behind cabinets but was left open so I can access my home audio system, my whole home router, and the electrical for the LED lighting in the crown molding.  All walls were painted the same grey color as the rest of the house.  


Once all the plaster and drywall work had been completed and painted, it was time to work on electrical.  I decided that for my crown molding I was going to have both color changing LEDs as well as warm white LEDs so I could make the entry look different just by changing the color.  I used LED light strip that I bought off eBay.  For the 20 meters (about 66 feet) of lighting it cost about $30 with the controller and power supply for the color strips and an additional $15 for the warm white.  Since the molding was so high up in the air, I wanted to find a way to install the lighting easily and also find a way to attach the lighting flat.  Any height difference in the strip would be visible on the ceiling.  I did this by cutting foam core the length of each side of the wall and then attaching the light strips to the foam core with hot glue.  All I had to do was then place the foam core in the groove behind the molding.  Here you can see the strips attached to the foam core.


Once everything was all hooked up it looked really cool.  Here is a picture of the warm white strips on.


Here is a picture of the colored LEDs in action. These strips allow me to pick up to 256 different colors.


I also have the option to have the colors automatically change.  I probably will not ever use this function but it is cool to see what it can do.  Here is a video of the lights on the rotating function.


The last part of the project was to add ceiling lights and a new chandelier.  In the old entry there was just one chandelier that hung off center in the entry.  I decided to change this by first adding two can lights on either end of the entry.  I also used LED lights in the cans so that I will not need to get out a ladder for decades to change them. 

Then came the chandelier.  Since I would be centering the chandelier in the middle of the entry, it would no longer be easy to gain access for cleaning. The light fixture came from amazon since I couldn't find one I liked locally that didn't cost a fortune, and this one turned out to look great in the entry.

 I came up with a crazy idea, but one that worked out well.  On eBay I purchased a $10 winch with a 30 foot nylon strap on it.  I then mounted this in the attic and attached the ceiling electrical box that the fixture attaches to at the end of the strap.  After installing a modular plug on the end of the light to connect in the attic, I was ready to go.  Now I am able to raise and lower the light whenever I need for cleaning or in case something goes wrong with the LED bulbs I installed in the fixture. 


Although this project took a couple weekends with my brothers' help, it really made a huge difference with my entry.  I cannot wait until I re-do the railing to see what everything looks like put together.  I am probably a couple months off on the railing since it is not a current project, but I will post about it when I get to that point.  Well that is all for now but keep tuned for more frequent updates since my house is torn apart right now.  Here is a sneak peek of the state of the kitchen so you can see how much is still to come.