Monday, July 6, 2015

The Pergola - Part One

It has been forever since my last blog post but a lot has changed at Casa de Sheldon.  This will be the first part of a two part post about the new side patio I have built.  The first part will cover the building of my new pergola and then the second part will cover the building of the patio.  If you remember from some previous posts about the fireplace, this area of my yard used to house old cars before I owned the home and was infested with weeds. 


After clearing out the weeds and building the fireplace, it was time to build a pergola.  Just to match everything else I have done to this point, I decided to go way over the top on the pergola.  I designed the pergola to have a lot of architectural elements but to also match the front of my house so it would all tie together.

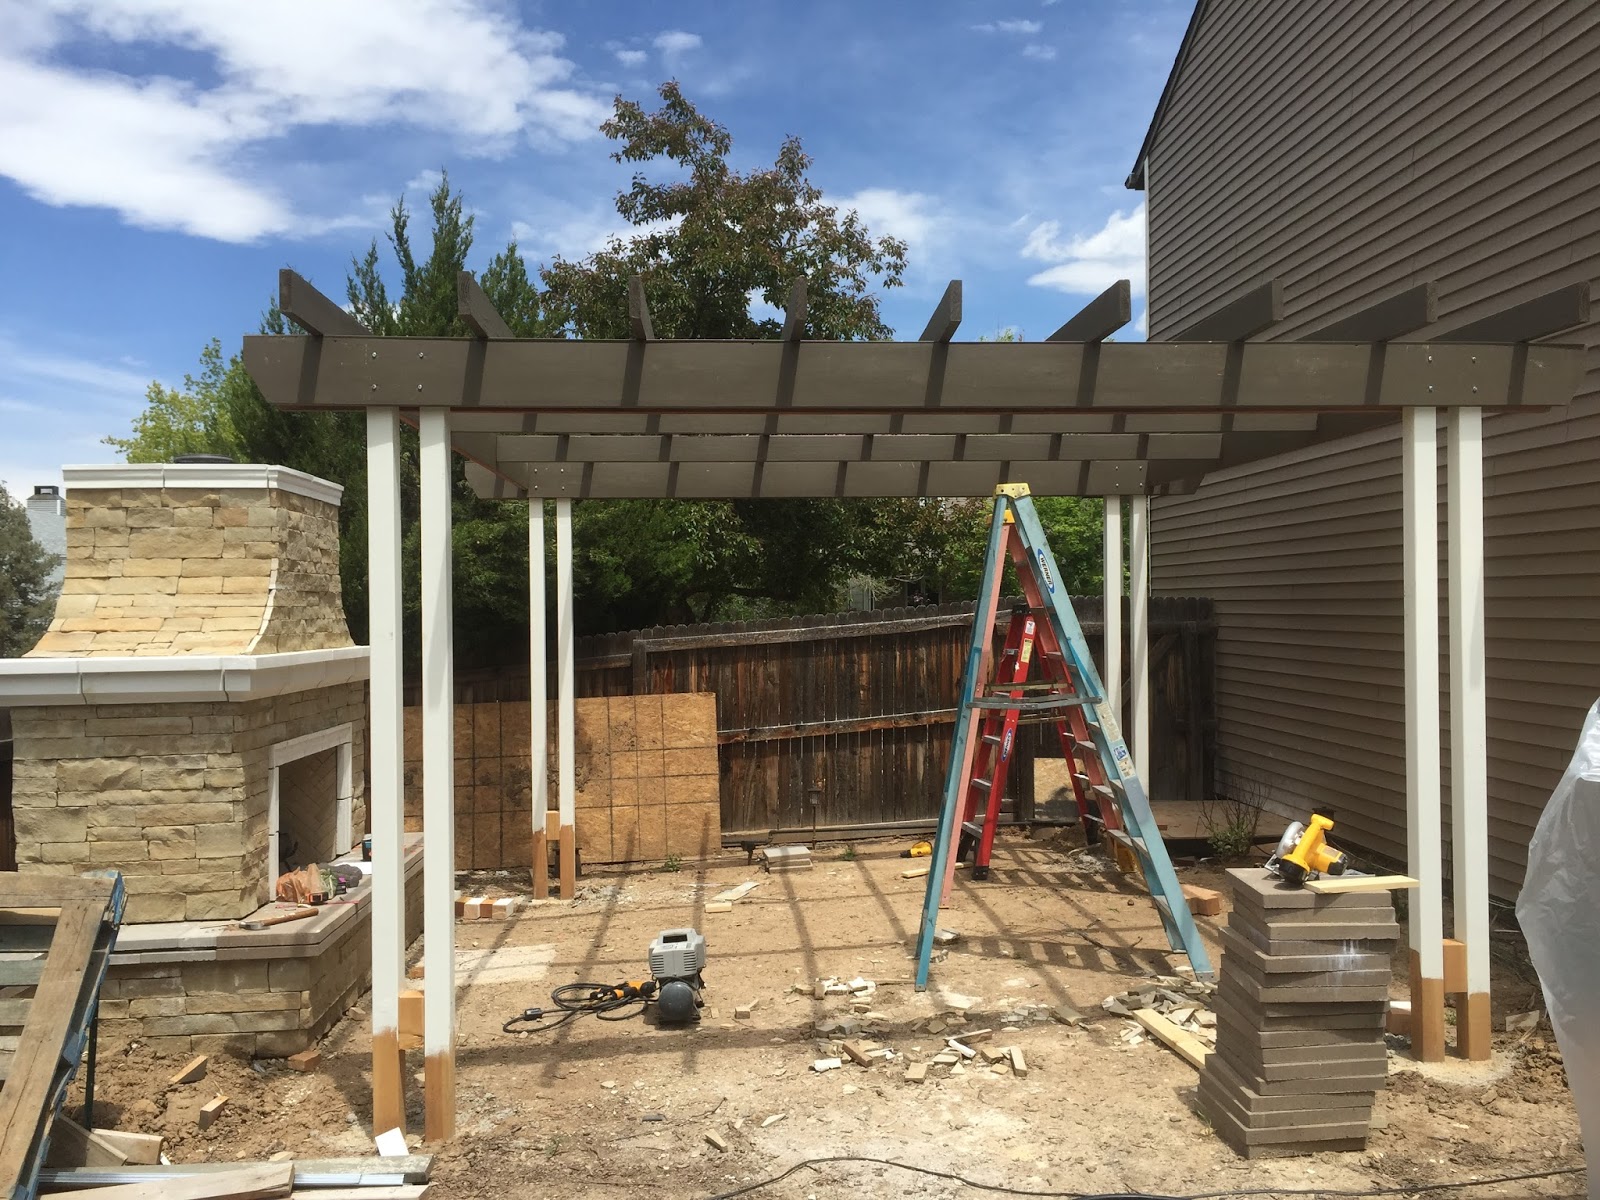
The first step was to install the main support posts.  The pergola was designed to be 16 feet by 16 feet so there needed to be quite a bit of support.  This involved using eight 4” x 4” posts that are 12 feet long.  All the posts were painted beforehand so it would also be faster to assemble.  I dug all four holes about 30 inches deep and then pre-assembled the posts in pairs so they would be straight when set in the concrete.  Once the posts were in the holes, they were set with concrete and made perfectly level.  You will see in the picture below that the paint did not go all the way to the bottom; this is because rock will go at the base of the columns and cover the wood.  The posts mimic the front of the house as well.


After a week to make sure the concrete was cured (and because I had work) my brother and I started on the top part of the pergola.  I really did not want to paint the wood above my head so I pre-painted all the wood in my garage.  This pergola has over 550 linear feet of lumber so it took up my entire garage.  Although many pergolas are made with cedar which has a rough texture, I wanted a cleaner design so I used pre-treated exterior #1 grade douglas fir.  I patched a few of the knots in the wood and then coated them with a sold stain so the grain of the wood could still be visible.  I used the stain that I used for the arbor above my garage (in a previous post) that I originally created by mixing five stains together until I found the perfect color.   In the picture below you will see about half of the lumber which has been stained.


All of the lumber is 16 feet in length and quite heavy.  The main supports of the arbor on each side are two 2x10 pieces bolted into the main support beams.  My brother and I hung them with screws temporarily while we made sure all measurements were correct and the wood was level.  There is a slight slope to this area for drainage but we wanted to make sure the arbor was straight otherwise it would look weird with the house.  Once Level, we went back and bolted the main supports to the support beams.  After everything is installed, there will be almost 1,000 pounds of lumber resting on the main supports.   In the below picture you can see my brother putting in the last of the bolts to get ready for the next level of lumber.


We also added 2x8 side supports and additional 2x6 center beams to help with the strength.


The next step was to add the cross beams which are 2x6 pieces of lumber.  The way the main supports were built allowed me to have a spacer 2x4 for me to screw through.  It is hard for me to explain, so please see the diagram below. 


I screwed long screws from below through the 2x4 and then up into the 2x6.  This not only allows me to hide the screws, but also allows a better metal connection to keep the wood from warping.  Below you can see all the top braces installed.  You can also see in the pictures that I angled the ends of the lumber to give it a little better design. 

The last step was to add another layer of 2x4 pieces of wood to connect the 2x6 boards together.  This also keeps the wood from warping while adding support.  Below is a picture taken from the top of the pergola. 


Every point where wood crosses over another piece of wood has either been screwed or nailed from above and cannot be seen from below.  On the entire pergola, only the main bolts can be seen and all other fasteners are hidden.  Here is another picture with the rest of the beams installed. 


Finally we added PVC molding across the top of the posts to mimic the columns on the front of the house.  We use PVC because it will not warp and for the details you want the seams to line perfectly.  It is a little more expensive, but it saves you a lot of trouble in the long run.  This product is installed the same way as wood with nails, screws, and caulking and can be painted just like wood.  Here are just a few more cool pictures.


One of my other reasons why I left an opening between the main support beams was so that I could add LED lighting.  I really wanted to have lighting that was always on so I decided upon tying these lights into my low voltage landscape lighting.  I found some LED lights that are dimmable on e-bay for $2 each that run off 12 volt AC or DC voltage.  I also bought a DC dimming module off e-bay for $4.  Since my landscape lighting runs off AC current, I needed to convert it to DC to run my lights.  I had some bridge rectifiers sitting around (yes I do keep those around) so I soldered one into a piece of wire and connected it from my dimmer to my landscape lighting wire that I have running around the house.  This makes no difference to the rest of the lighting because the rectifier is just on the wire leading to the pergola. Below is a waterproof box that I have inserted into one of the stone columns that allows me to dim the lights.  


To make the LEDs look really nice with the pergola, I purchased the lights with a polished aluminum ring so it looked like they were already in a light fixture.  I took a 2x4 that was pre-stained and laid out where the lights should go.  I then used a 2” hole saw to bore a hole in the lumber that would make a tight pressure fit with the light bulb and I could still remove them later if needed.  


I used low voltage landscape wire to run between the lights and connected the wire to G4 bases so the lights could plug into them.  The entire cost of the lighting, wiring, and dimmer was about $50.   I then place the piece of wood in the opening and attached with nails.  I filled the holes and touched up the stain so you cannot even tell that nails were used. 


After linking up the wiring and attaching the dimmer everything turned out great.  It was an easy project but really took the pergola to the next level; not to mention created much more of a living room feeling to the patio.  Below you can see the lights on at night but they can be dimmed to a low level or turned all the way up making a very bright area.  I will add a light fixture in the center of the pergola at a later point but it will also run off the low voltage landscape lighting system. 


Well that is all for part one.  I have the rest of the patio in and most of the stone work completed so I will leave you with a sneak peek at part two of the pergola post.  


Wednesday, March 11, 2015

The Fireplace - Part Two

In this post we will start again with the adding of the stone.  In my past posts about installing the stone veneer on various projects, I installed metal mesh before adding mortar to the stone.  Since I have cinder block for the bottom portion of the fireplace, I did not add mesh because the stone will stick to the surface since it is already irregular and porous. The only difference when adding the stone is that you should wet the cinder blocks with water first.  This is because the dry cinder blocks will otherwise soak up all the water in the mortar and it will not cure and hold properly.  Below you can see the progress on the stone for the lower part of the fireplace.  I am still cutting each stone to make a tight fit so it took probably close to 35 hours to do all the stone.


Since the top half of the fireplace is still wood covered in tar paper, I added mesh so the rest of the stone would stick to it just like I did on all my other columns.  You will notice in the picture below that there are pavers being placed for the hearth.  I am using two levels of pavers instead of pouring a solid concrete slab to keep the weight down.  The pavers will be covered with a fiber reinforced concrete in the future so it will still look like a solid slab when I am done but it will be half the weight.  The pavers are mortared in place and since they are concrete as well, they will attach to the cinder block and will not be moving anytime soon.  I also added welded wire mesh between the layers of pavers to help if any settling does occur and to reinforce the area for seating.  


Originally I planned to just leave the inside of the firebox the cinder block and then paint the interior with black high heat paint.  Since the fireplace was turning out so well I decided that I really needed to finish the inside of the fireplace in brick to make it look even better.  Most fireplaces use firebrick which is more of a ceramic than a brick to hold up to the high heat of wood fires.  Under repeated high heat, a normal brick deteriorates and will eventually crumble.  Since this fireplace is only natural gas, the temperature does not get hot enough to deteriorate regular brick.  I decided to use a blonde thin brick that resembles fire brick.  This brick is only 1/2” thick so it is made for decoration and is actually cut from the face of a full size brick.  This type of brick is normally around $15 a square foot. To do my fireplace I needed about 40 square feet so it was going to be quite expensive.  I found a guy on craigslist that sold me some leftovers he had for a little over $1 a square foot.  I paid $45 for all of it.  Below was my great haul laid out on the floor in a herringbone pattern.


It turned out to be a little tricky to install the brick.  I used mortar again but had to wet the cinder block and the bricks to keep the mortar from drying out too fast because both materials were so porous.  I also had to take very precise measurements because with this pattern if the bottom row is slightly crooked, each row above it gets a little more off until it is all messed up. In the below picture you can see the back completed and all the cuts I had to make everything fit. 


I waited a day for the back to fully cure before I started on the two other sides.  The bottom of the firebox will be covered in sand so I did not add brick to the bottom. Below is the final product of all the brick work.  It turned out real well but turned out to be quite the task.   


For the fireplace I really wanted to have decorative molding but was having trouble figuring out what to do.  I had seen moldings made out of Styrofoam and then covered in stucco but they are a fortune and I really wasn’t sure how well they would hold up in Colorado weather.  I was reading online about making fountains out of concrete and I realized that the same technique could be used in my project so I decided to try and make the moldings out of fiber reinforced cement.  The cement is called Quickwall by Quickrete.  This stuff may be my new favorite building material as I am finding so many uses for it!  I first made a pattern as to what I wanted the molding to be.  I gave this to my brother who went to my Dad’s sheet metal shop and made a mold for me. I had my brother make the mold longer than I needed so that I could change the length of the piece each time depending on what I needed.  In the below picture you will see the small mold I had made.  I cut pieces of metal to fill in the ends and left extra metal so I could use clamps to hold it together.  Since I would need to make almost 20 pieces of the small molding, I wanted to be able to re-set the mold quickly.  


I only had one mold, so every night after work I would make a new piece.  I started by spraying the inside of the mold with vegetable oil.  This would help me remove the concrete once it started to harden.  The concrete I mixed to a very thick constituency almost equal to toothpaste.  I would then fill the mold half way with concrete and then tap the sides and bottom to make all the air bubbles float to the surface.  I would then add the second half of the concrete and smooth out the top.  The next day I would pull out the casting and then re-set the mold to make another piece.  Here is a pile of pieces I had already cast.


Since these pieces were longer than what I needed and would not have perfectly squared edges on the ends, I ran them through my wet tile saw to cut everything straight.  I also cut some pieces at 45 degree angels to miter the corners.  These pieces were then attached by using mortar and held in place with braces until the mortar dried.  Below is a picture of the smaller pieces installed.  There are gaps between the pieces that will be filled in with more mortar in the future to make it look like grout lines. 


The next step was for me to cast the larger pieces of molding for the fireplace.  Again like the last mold, I made a template and my brother folded up the metal for the form.  Because these pieces would be much larger (almost 40 pounds each), I needed to create a different type of mold.  Because the weight of the concrete would bend the mold slightly if it was unsupported, I needed to create an additional form for the mold to sit in to the mold would stay exactly the same for each casting.  I did this by creating a wood frame that was a little larger than the metal.  This piece of molding was to have a large arch in the middle so I needed to make sure it was supported.  I did this by placing a piece of plastic over the back of the mold and then setting it in the frame.  The next step was to fill the void that was created with expandable spray foam so that the material would expand to the unique shape and give support.  Once the foam dried I cut the excess foam away and it gave a very sturdy backing for my mold.  You can see the completed mold below.  


After I had created many of the smaller castings, I found that it would be helpful if I could reduce the weight of the larger castings and also create an easier way to attach them to my fireplace.  First of all, I started using large blocks of high density foam to stick in the center of the mold.  This reduced the weight quite a bit but did not reduce the strength since they were encapsulated in the fiber reinforced cement.  Below you can see a picture of a cut-away on one of the pieces where you can see the foam. 


 The next change was that I added five inch bolts to the back of the casting while it was wet.  I added a large washer on the top of the bolt to help it grab better in the cement and then buried about half of the bolt in the wet cement.  You can see this in the pictures below. 


My brother then helped me lift the heavy pieces in place with mortar on the back of the pieces.  We pre-drilled holes for the bolts to go through the fireplace and then attached washers and nuts to the back side to not only help support the piece while the mortar dried but to also be the main anchor point.  Below you can see all the pieces mounted.  You may also note that some of the pieces are cut long.  This was so I could grind the extra cement away to make the contour of the ends match the adjoining pieces.  


After the main mantle was installed, I continued to work on the stone for the rest of the fireplace.  Since there is a curve towards the top, I had to cut each stone by hand with a slight angle so that it would look correct on both sides.  You will also notice in the below picture, that once the point on the chimney is reached where there is no curve, I had to make sure that all my lines of stone lined up so it looked like one level all the way around.  This wound up being no easy task since there is no standard width to any of the stone and I had to account for the difference in the prior few rows so it would look correct when I got to that point. 


In the above picture you will see that I attached the top molding a little differently.  Since there is no stone above the molding, I would not have any extra pressure to help hold the stone in place.  For this I attached a metal edge to sit the concrete molding on.  I also embedded some metal straps into the concrete while it was drying so that I could screw it into the top of the frame.  The top of the fireplace is actually covered with a piece of galvanized metal to keep rain and snow out and I sloped the top towards the back for the water runoff.  Here is an up-close picture of the mounting that gets covered up by mortar and stone so it isn't even noticeable.


Unfortunately I did not really take many pictures of the inside workings of the fireplace as I was building it.  I made a cardboard template of the top of the fireplace opening and had my brother make a chimney cap to funnel the heat.  I then cut a hole on the top of the cap and ran metal flexible flue liner up through the top of the fireplace and attached a vent to the very top of the fireplace.  The flue liner directs all the heat out of the top but also keeps all the heat away from any of the wooden parts of the fireplace.  I will build a decorative cap to cover this up at a later point.  In the below picture you can see the metal vent.


The back of the fireplace has since been covered with a coat of fiber reinforced cement to match the rest of the fireplace.  Once it gets warmer I will paint it a color that will match the stone but since it is only seen from the street, I did not go to the trouble of putting stone on the back.  There will also be an access hatch on the back so I can get to the gas line and also use it for storage of outdoor torches and such.

There is still the task of covering the paver hearth with the fiber reinforced cement and grouting in the gaps between the cement castings, but that will all happen this summer when it is warmer.  You will see that everything is now cleaned up and I also finished grinding all the moldings to the right contours in the corners.  I am really happy with how it turned out and just wait until you see how it works with the pergola I am building on this side of the house.  I figure between my brother and I, we spent about 75 hours on this fireplace with most of it being the stone and brick work.  My schedule shows me completing this part of the yard in the very early summer so keep watching for updates soon.  So I will leave you with a few pictures of the (almost) finished product.


Monday, January 26, 2015

Completed Project Updates

Last night I started writing a long overdue post for part two of the fireplace.  I visited my blog to see where I left off and realized that of all the posts I have posted, it seems like I never show the finished project.  This post is to recap a few smaller projects from the last few months as well as the finished product from other projects. I will give the part two fireplace update in the very near future. 


Back Yard
In the last post about the back yard, I left off right after the grading was completed and the retaining wall was installed.  When the grading was completed, the sprinkler system was no longer going to be usable and it was going to need re-designed.  I added two zones and fitted them with special rotor heads that would allow me better control of the watering area and the amount of water used.  It turned out being quite a bit of work to dig down deep enough to run the pipes so that when I aerate the yard the knives do not puncture the pipe.  The soil here has a ton of clay in it so it is tough to dig in.  Below you can see some pictures of my sprinkler system as I was installing it.


I also finished the retaining walls by adding stone columns on either end of the wall.  I created these columns a little differently because they will be more exposed to weather.  Instead of making the base of the column out of wood, I made the columns out of aluminum studs and cement board so there is no chance of the elements deteriorating the columns over time.  I then added the stone the same way as I have on all the rest.  Below are pictures of that process.  


For the column caps I did something a little different.  I wanted the look of concrete but did not want the weight on the top of the column as the cap would weigh over 200 pounds.  I instead used high density foam insulation.  After I cut the insulation to the size I wanted, I coated it with cement bonding adhesive.  The solution looks a lot like Elmer’s glue but is used to bond new concrete to existing concrete. 


Once the bonding agent had dried, I then coated the entire surface with fiber reinforced cement.  This material is called Quickwall by Quickrete and is used to smooth out cement walls.  Once the cement dried it looked just like a solid cement slab.  


I then decided I wanted to add some landscape lighting to the underneath side of the caps to show off all the stone work I did.  I found some waterproof LED light strip on e-bay and paid $8 for a 30 foot roll.  


The lights run off of 12 volt DC current.  I wanted to add the lights to my existing landscape lighting but the system is 12 volt AC current so they are not compatible.  To fix this I purchased 10 bridge rectifiers off of eBay for $1.50.  I soldered the rectifier into the wire leading to my landscape system and it converted the AC current into DC current so it could work correctly.  To make the lights sit flush with the bottom of the cap I used a soldering iron to melt a groove in the foam to sit the LED strip in.  Below is a picture that shows the caps installed and the lights working.


My brother and I also added metal edging to the entire yard and used nine yards of mulch to fill in the flower beds.  We laid down black plastic to keep weeds from growing through the mulch.  A lot of people use weed barrier which is a fabric that allows water through.  I have found that plastic really works better for me since I use a drip system for my plants so water goes to the base of every plant and I find the weed barrier does not really stop many weeds.  


The last step was to add sod to the back yard.  I did not want to go to the trouble of adding seed to grow grass so I found a guy online that sells sod in Parker and it is really cheap.  I spent about $400 but it was for 1,200 square feet of sod which was 120 rolls.  It actually took me three trips to get it all because it was almost 7,000 pounds. Below are the pictures of the sod installed. 


I also had a lot of pots around my back yard and up until the golf ball sized hail hit my house, the back yard looked real good.  Here are a few pictures of that along with the hail that mutilated everything. 


Window Re-Cap
The last post on the windows ended before the trim was installed.  I used exterior trim and framed out the windows to give a little more character to the back of the house.  It was so hot during the day that I would work on them after dark so it was more bearable.


Here is the finished product.


I also framed out the inside of the windows as well using a different type of trim.  They still need painted but I will do that when I re-do the family room in the next few weeks.


I also replaced the garden window in my kitchen because it was falling apart and really didn't match the house.  I removed the window and replaced it with a new sliding vinyl window.


I am getting pretty good at replacing windows so this only took me a couple hours.  Here is the finished product.  


I sold the old window on Craigslist for $40 to someone who needed some parts off of it to fix his window that was falling apart. 

Patio
When we last left off with the patio cover, I was working on the ceiling. I wanted to do something special with the ceiling of the patio to make it seem like more of a living room.  I used 4 foot wide by 9 foot long sheets of flake board I found on Craigslist for the ceiling.  I wanted a stucco type look so I used a paint called DeckOver which is basically paint with sand in it.  It is used for coating old splintery decks so it looks solid again and fills in cracks.  You use a special roller for it and it gives a cool stucco texture.  It can be tinted any color and to do my 9 foot by 20 foot patio it took seven gallons.  I then did a top coat of regular paint just to fill in some of the small holes it leaves.  My brother then helped me install the panels because a huge 60 pound sheet of wood is hard to install over your head by yourself. 
I decided I really wanted the patio to feel more like an outdoor living room.  To do this I added four LED can lights and also wired in ceiling speakers so I can hear my home audio system outside.  I also added a switch on these speakers so I can re-route the sound to speakers buried in the ground over by my fireplace. 


The last step was to cover the seams with trim and to make the ceiling have a coffered look.  I used the same wood trim that was used around my windows but I painted it a dark color to contrast it.  It turned out really well and you can see the result below. 


Well that is all for the update this time.  I will have an update on part two of the fireplace soon.  I have also started major parts of the interior renovation so posts about that will begin soon.